Autopilot Sends
In this section
- How Autopilot works.
- Setting up Autopilot — with all the details!
- Managing people and updating your settings.
- Adding and updating people in Autopilot.
- Removing people from Autopilot.
- Adjusting survey frequency.
- Turning off Autopilot.
- Exporting your Autopilot list.
- Adjusting Autopilot automatically using the API.
- The advantages of Autopilot.
Suggested next articles: The People Tab and Reminders.
How Autopilot works
Put your CX project on Autopilot and take the worries out of survey scheduling!
With Autopilot you can:
- 1
- Set the timing of your CX survey sends
-

- 2
- Schedule your "evergreen" CX surveys to relaunch → (every 3, 6, or 12 months)
-

- 3
- Upload amended email lists with a CSV or Excel file → (or simply Paste your lists by hand)
-

- 4
- Open your "Adjust Autopilot settings" → (by clicking "Edit and send" followed by the Email tile's "Gear" menu)
-

- 5
- In your settings, adjust the survey's frequency, export your Autopilot list, or even "Turn off Autopilot" altogether! (Your wish is Autopilot's command.)
-


-
Can I still use the One-time survey sends with Autopilot?
Yes!
Send One-time surveys as needed — even when Autopilot is fully activated. Just switch between the “Autopilot” and “One-time survey” tabs and send away! Click here to read all about One-time survey sends.


Setting up Autopilot — with all the details!
Autopilot can automatically recur your survey in two ways:
Option A: Sampling your respondents evenly over the timeframe you select — ex. over 3, 6 or 9 months. Sends are spread out on weekdays at times that yield higher response rates. This option keeps a more constant flow of feedback coming into your Dashboard (trickling out surveys like a garden hose)
Option B: Recurring the survey to your entire list — at a time you set. This option pushes responses to your Dashboard at quarterly intervals (by gushing out surveys like a firehose, then shutting itself off for 3, 6, or 9 months before turning on again)
To use Autopilot:


| You have two activation options: | ||
A |
Let Autopilot work it's magic! | Click “Add [x] people to Autopilot” when it first appears and your sends will be scheduled automatically. No worries!
|
B |
Schedule your Autopilot sends | Select "or schedule first send" . . .  . . . and then set your own schedule for your Autopilot sends. When ready, click "Schedule and add Add [x] people to Autopilot" . . . and then set your own schedule for your Autopilot sends. When ready, click "Schedule and add Add [x] people to Autopilot"  Note: With option B, your survey will be sent to your entire panel at the time you schedule. The send will repeat, again and again, at the quarterly interval you picked — (3, 6, or 12 months later) Note: With option B, your survey will be sent to your entire panel at the time you schedule. The send will repeat, again and again, at the quarterly interval you picked — (3, 6, or 12 months later)
|
-
Look at the banner!
A banner in the Dashboard will let you know if everything is scheduled properly.


Managing people and updating your settings
From the Autopilot page, you can:
| 1 | Add and/or update your people in Autopilot |
| 2 | Remove people from Autopilot |
| 3 | Adjust survey frequency |
| 4 | Turn off Autopilot |
| 5 | Export your Autopilot list |
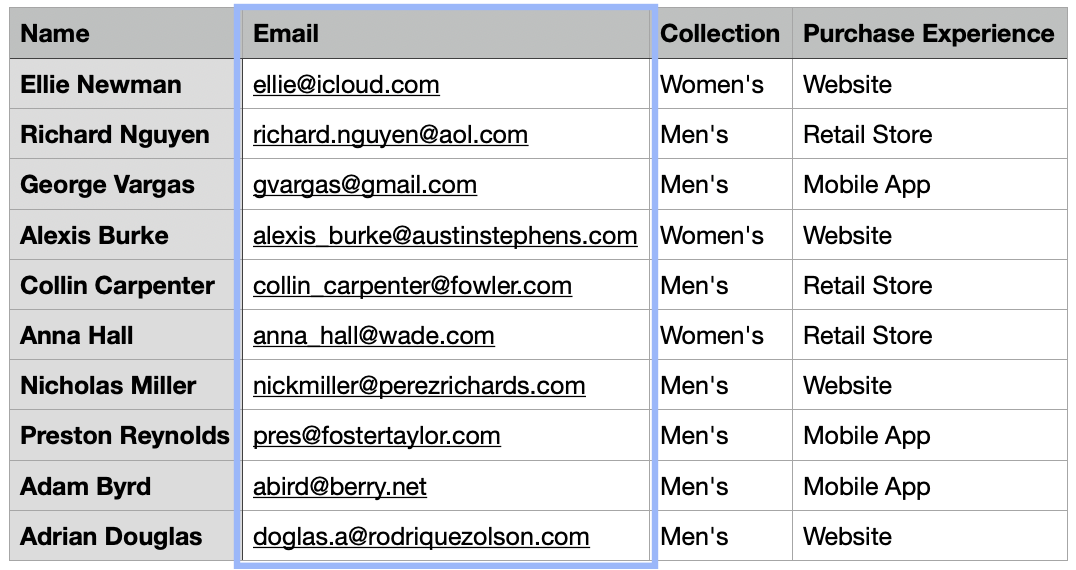
1. Adding and/or updating people in Autopilot
Update and add people to Autopilot simultaneously. Those who are already in the Autopilot schedule can be updated — while those who are not will be added to the rotation.
- 1
- Open the Autopilot page
- 2
- Select the radio button for "Add new people or update existing people"
- 3
- Prepare and upload your CSV or Excel file with the people you’ll be adding or updating → include any contact information and properties you’d like to add
-
To update correctly, make sure the addresses in the 'Email" or "Phone number" columns of your CSV or Excel file match the existing people in Autopilot.
-
Beware, the updates will overwrite any existing information!
-

- 4
- Click “Next: Review before adding/updating”
-

- 5
- Make sure the details on the review page are correct
- 6
- Click “Add" or "Update [x] people in Autopilot”
-


2. Removing people from Autopilot
- 1
- Visit the Autopilot page
- 2
- Select the radio button for “Remove people from Autopilot”
- 3
- Upload a CSV or Excel file → including the emails or phone numbers of the people you’ll be removing
-
- 4
- Click “Next: Review before removing”
- 5
- The review page will show the notification “[x] people will be removed from Autopilot”
- 6
- Click “Remove [x] people from Autopilot” followed by "Next: Review before removing" and delete the user on the next page
-


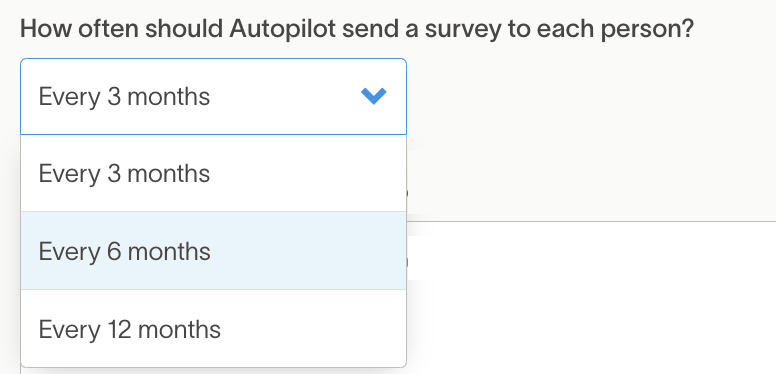
3. Adjusting survey frequency
- 1
- From the Dashboard → choose "Edit and send"
- 2
- Click the "Gear" icon → to the right of the platform's tile
- 3
- Choose “Adjust Autopilot settings”
-

- 4
- Select a new option under “How often should Autopilot send a survey to each person?”
- 5
- Click “Save changes”
-


4. Turning off Autopilot
- 1
- From the Dashboard, choose "Edit and send"
- 2
- Click the "Gear" icon to the right of the platform's tile
- 3
- Choose “Adjust Autopilot settings”
-
- 4
- Click “Turn off Autopilot”
- 5
- Click the red “Turn off Autopilot” button
-

-
Turning off Autopilot will remove your Autopilot list When you turn off Autopilot, sends are cancelled and your list is deleted. Ergo, don't turn off Autopilot until you are ready!

5. Exporting your Autopilot list
To export your panel in a CSV format:
- 1
- Choose "Edit and send"
- 2
- Click the "Gear" icon to the right of the platform's tile
- 3
- Choose “Adjust Autopilot settings”
- 4
- Click “Export Autopilot list”
-


Adjusting Autopilot automatically using the API
You can use the Delighted API to automatically add, update, and remove people from Autopilot, making it super easy to manage your Autopilot list with minimal effort.
An example use case
Say you have a subscription-based offering and want to survey customers after they sign up, as well as every 3 months after this. With the API, you can trigger a call to the Sending to people endpoint to fire off the post sign-up survey immediately, as well as trigger a call to the Adding people to Autopilot endpoint to automatically schedule the ongoing surveys. No need to sign in and do a manual upload of your new customers on a regular basis!
| Getting Autopilot configuration | Tells you whether or not Autopilot is turned on |
| Listing people in Autopilot | Allows you to list everyone who is currently enrolled in Autopilot, including when their next survey is scheduled and which properties will be associated with that survey send |
| Adding people to Autopilot | Allows you to add people to Autopilot or update the properties associated with someone who is already in Autopilot |
| Removing people from Autopilot | Allows you to remove people from Autopilot so that they no longer receive Autopilot surveys. Removing someone from Autopilot will not affect their previous responses or any historical data |
Check out our API Guide for more information about using the Delighted API!
-
Using Autopilot through the Zapier Integration Delighted's Zapier integration allows you to access the Autopilot API endpoints through Zapier's easy-to-use workflow automation platform. You can use the Autopilot Zapier actions and searches to add and remove people from Autopilot, as well as list everyone in Autopilot, search for particular people, and check whether or not Autopilot is turned on. Read more in our Zapier Integration guide!
The advantages of Autopilot
Set the schedule for your CX project, and Autopilot will take care of the rest — automatically performing 5 time-saving tasks for you:
| 1 | Scheduling optimization | Evenly scheduling your Email and SMS surveys to a group of people, over a time frame you select, and during ideal time windows (Mon. - Fri. mornings) |
| 2 | Capturing continuous feedback | Spreading out your sending so that you’re continually receiving feedback from smaller segments over time, making your closed-loop process more manageable |
| 3 | Enforcing your cadence | Surveying individuals on a cadence you mandate (ex. once every 3, 6, or 12 months) |
| 4 | Recurring your survey | Rescheduling and repeating your project when the prior cycle has concluded |
| 5 | Building into existing workflows | Optional: Take advantage of our Autopilot API endpoints to add a relational component to your current program without building new scheduling workflows |
-
Example Use cases: and fine printIf you select a "3 month" cadence, Autopilot will continuously distribute your CX survey project throughout the 3 months. To maximize your response rate, surveys will be sent during ideal time windows — (ex. Monday through Friday, from 5am to 10am).
If someone has been surveyed previously outside of Autopilot, they will receive their first Autopilot survey based on their last sent timestamp. For example, if the last survey was sent 2 months ago, Autopilot will schedule their next survey in 30 days to satisfy your "3 month" cadence.
After the initial survey is sent, Autopilot will automatically reschedule (recur) a person to receive another survey at the prescribed "3 month" interval.