The Link Platform: Sending CX surveys via Link
In this article:
- The Link platform — always at the ready!
- The Links page — organizing your links.
- Customizing and updating your Link surveys.
- Crafting links with the in-app Link Builder.
- QR codes — generating, downloading and testing.
- Adding properties with the in-app Link Builder.
- Appending properties to links — the traditional method.
FAQs
- Why are respondents getting a “We can’t find the page you’re looking for” error?
- Why are newer responses overwriting older responses?
- Can I recover respondent information from an anonymous response?
- Why are new responses not being recorded?
Suggested next article: CX Customization Basics
Introductory video
-
Click CC to enable captions in YouTube. [Stop at 6:42]
The Link platform — always at the ready!
The Link platform was set up the instant you created your project!
Just hit "Edit and send," copy your live link, and start sharing your survey immediately.

-
How the Link platform works Our most versatile platform, Delighted Links are short URLs that launch surveys. For example, https://delighted.com/t/Bo5cKjF1 launches this survey with a single click. (Try it!)
QR codes can also be downloaded from the in-app Link Builder. With a simple scan, this image launches the same survey as the link above. (Try this too!)
-

The Links page — organizing your links
Click "Adjust settings" (marked above) to open "Your links" page, which lists all of a project's Links.
Yes, you can create multiple Links for each survey — for any location, product, team member, anything you like!
The Links page will let you:
| A | Add a new link | Create new, unique links for a survey — in the Link Builder |
| B | Adjust Settings | Make changes to any existing link — in the Link Builder |
| C | Copy links | Click the Copy icon for each link as you need them |

To open your Links page and the individual link "Settings":
- 1
- Select “Edit and send”
- 2
- Click "Adjust settings"
-

- 3
-
Click "Settings" to open the in-app Link builder page — and access a dozen features!
-


Touring the in-app Link builder
You can have a bunch of customized link for each project! Add a new link, Copy your link, and Click Settings, which opens up a dozen ways to customize your links. There's a lot to discover — let us show you!"
Use our in-app Link Builder to quickly create, test, and distribute survey Links and QR codes across all your channels:
-
Apps, Chats & Messaging Embed link surveys seamlessly into apps, SMS, chats, & emails Digital, Social & Physical Spaces Integrate links effortlessly into web pages, social media, printed materials, and presentations Video & Live Events Capture feedback during video calls or conferences with on-screen QR codes
-
Effortless Link Customization Tailor-make custom survey links in seconds with our in-app Link Builder — as explained in this snappy video. (Note: "Edit and send" has replaced the "Survey people" button.)
The value of anonymity
Results from Link surveys are anonymous by design, which is important for studies requiring privacy.
Link platform responses appear in the Dashboard with unique identifiers — such as "Person (0123456789)" — so that anonymous results can be rendered on Permalink pages and aggregated into your summative Reports and Link Platform Metrics.
-

Need to collect names and email addresses?
1. Add the “Name” and “Email” Additional question types to your Link platform survey so respondents can voluntarily enter their names and contact email.

2. You can also attach contact information to outgoing links to identify your respondents. It’s a bit technical. We'll show you how it's done in Appending properties to links. Here's an example:
https://delighted.com/t/Bo5cKjF1?name=Sean&email=sean%40delighted.com&purchase_location=retail


Customizing and updating your Link surveys
To customize, edit, and update you Link platform survey:
- 1
- Click “Edit and send”
- 2
- Choose the "Pencil" or editing icon
-

- 3
- Change the "Brand/Product name" → if you wish
- 4
- Optional: Re-customize your Link survey by adjusting your:
-
1. Branding; 2. Metric question; 3. Intro message and translation; 4. Comment question; 5. Additional questions; 6. Thank you page; 7. Change your CX metric; 8. Desktop/Mobile
Learn all the details in CX Customization Basics -

- 5
- When you're ready to start sending your survey, click "Skip to finish" → (or select "Next: Finish" from the Thank you page)
-


-
3 important options to consider . . . at this moment!
A Click “Additional questions" Add up to 10 Additional questions following your primary Metric and Comment page questions B Pick “Thank you page" Customize your Thank you page and unlock the power of post-survey engagement and related links C Select “Skip to finish" To start immediately, click "Skip to finish" and jump to your in-app Link Builder seen in step 6. From there, you can copy your URL or QR code and begin sharing your survey! (See also Testing a link)
- 6
-
Are you creating multiple Links for a single survey?
The Links page organizes multiple links and locations (tied to a single survey) in one convenient page.
-
- Copy the Link you need
- Click "Settings" to modify each link
-

-

Crafting links with the in-app Link Builder
In this section:
- Launching the Links page and the Link Builder.
- The Link Builder's 13 options.
- Adding new links.
- Testing and previewing the Link platform.
- Filtering link results.
- QR codes — generating, downloading, and testing.
- Link platform customization.
- Editing link names.
- Deleting a link.
- Using vanity URLs to identify links.
- Preventing multiple submissions.
- Generating and using links for each scale point.
Launching the Links page and the Link Builder
The in-app Link Builder hosts more than a dozen link defining options in one convenient place. It's here where you'll add, differentiate, and customize the links you need for your survey projects.
Use our in-app Link Builder to quickly create, test, and distribute survey Links and QR codes across all your channels:
-
Apps, Chats & Messaging Embed link surveys seamlessly into apps, SMS, chats, & emails Digital, Social & Physical Spaces Integrate links effortlessly into web pages, social media, printed materials, and presentations Video & Live Events Capture feedback during video calls or conferences with on-screen QR codes
The Links page organizes your links and will let you:
| A | Add a new link | Create new, unique links to this project's survey in the Link BuIlder |
| B | Adjust Settings | Make changes to any existing link in the list in the in-app Link BuIlder |
| C | Copy link | Click the Copy icon for each individual link as you need them by — either for sharing or testing your project |

Open your links list and Add a link
To open your Links list and the Link Builder:
- 1
- Click “Edit and send”
- 2
- Select “Adjust settings” → from the Link platform tile
- 3
- From your list of links, choose "Add a new link" → and take advantage of all the editing features in the Link Builder
- 4
- Click "Back to links" → and view your Links list once again
-


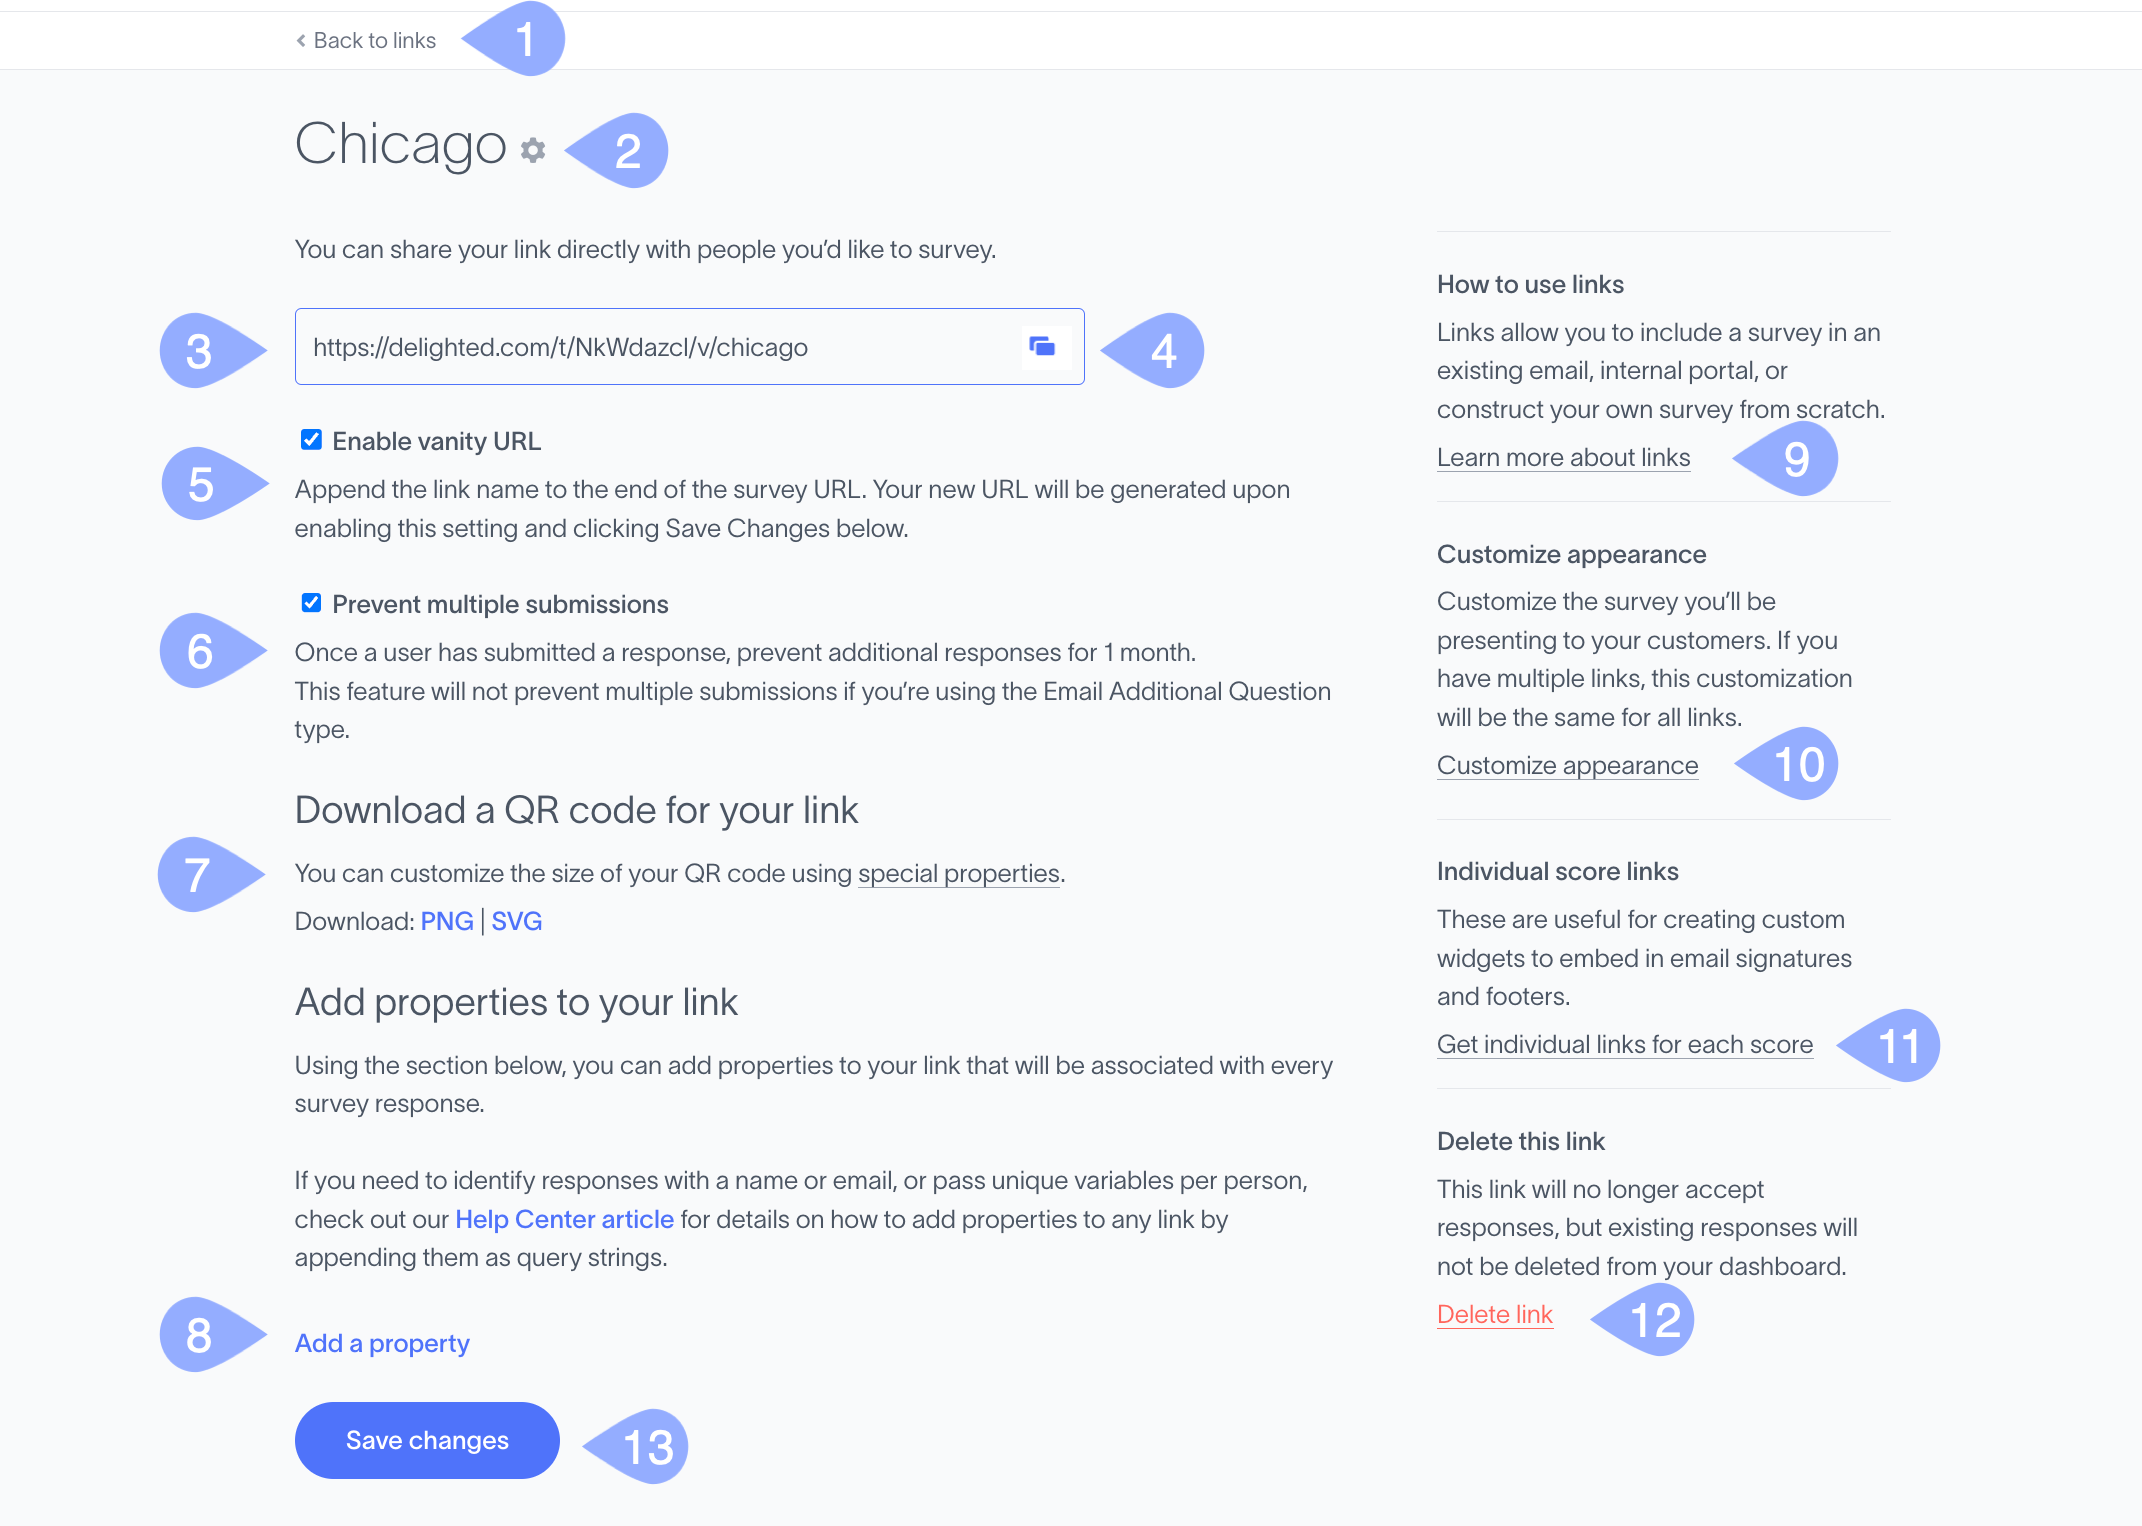
The Link Builder's 13 options
Here's a quick rundown of the options packed into the in-app Link Builder.

| 1 | Back to links | Return to “Your links” list |
| 2 | "Gear" icon | Change the name of a link |
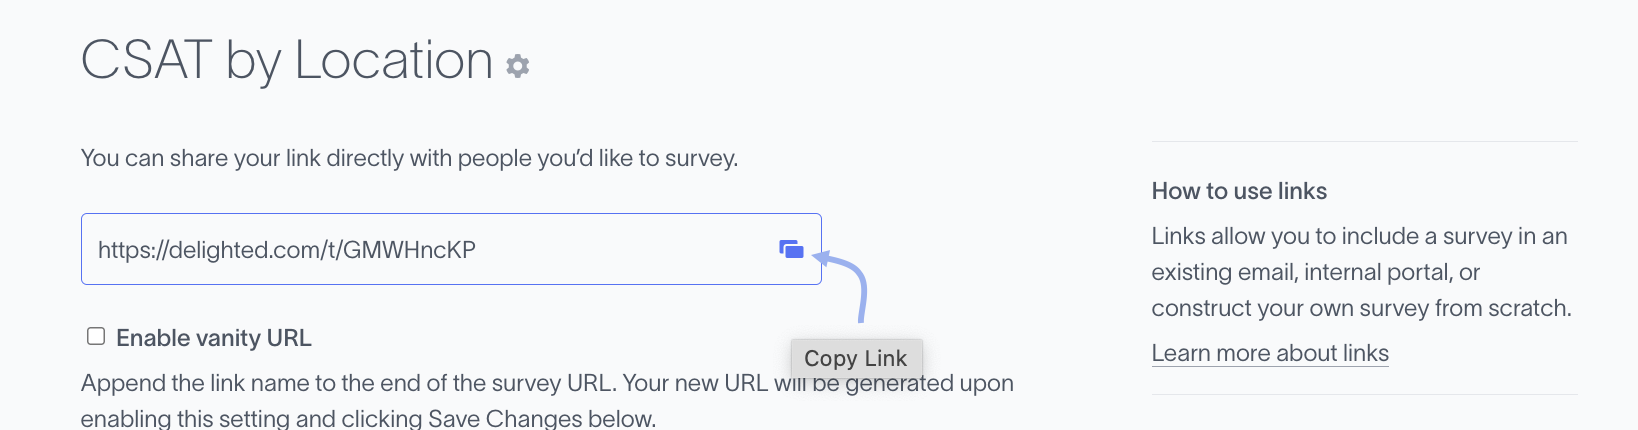
| 3 | Your unique link | This is your auto-generated link. This URL and matching QR code never change, even as you update your project |
| 4 | Copy link button | Click to copy your link to your clipboard |
| 5 | Enable vanity URL | Check this box to append the name of the link to the end of the URL so you can instantly tell it apart from the other links in your list |
| 6 | Prevent multiple submissions | If checked, cookies will limit responses from a single device for a 1-month period. (Uncheck to allow unlimited responses from the same device) |
| 7 | Download QR code for your link | Choose between PNG or SVG image files. (As you click your choice, the QR code will be downloaded) |
| 8 | Add properties to your link | Add a "Property name" and a "Property value" for each new property you append to this link |
| 9 | How to use links | Click to return to this Help Center article |
| 10 | Customize appearance | Click to open the customization tools for this survey |
| 11 | Individual score links | Generate a link for each scale point in your survey (ex. 5 links for 5-star surveys or 11 for NPS). Email signature surveys are a great use case |
| 12 | Delete this link | Delete the current custom link. (This does not delete the data already collected with the link) |
| 13 | Save changes!!! | Apply all of the changes you have made to this link |
Adding new links
Use the Link Builder to create as many custom links as you need for your survey. You can define links that will segment responses from different:
- Locations
- Team members
- Points-of-purchase (ex. online, mobile app, or retail)
- A/B marketing comparisons
- Product lines (ex. Kids' vs. Adults' collections)
-
For example . . . Think of a company, like Hem & Stitch, that wants to send the same survey to its customers — while also segmenting the performance from several locations!
In this sample survey, we’ve added links for “Paris” and “Guadalajara. " Now let’s add a link for a “Chicago” location.
To add a new link:
- 1
- Click “Edit and send”
- 2
- Choose “Adjust settings” → from the Link platform tile
- 3
- Click “Add a new link” → seen below the list of existing links
- 4
- In the Link Builder, name your new link → (ex. “Chicago”)
- 5
- Click “Save and finish”
- 6
- Select “Back to links” → and return to the Links list
- 7
- Add more links → by repeating steps 3-5
-
Testing and previewing the Link platform
To test and preview any link in your project's list:
- 1
-
Reopen the Links list → by clicking “Edit and send” followed by “Adjust settings” from the Link platform tile
- 2
- Click the “Copy” icon → next to any link in your list
-

- 3
- Paste the link into your browser → and press “Enter”
- 4
- Preview by taking your survey!
-

-
Why are my test responses being overwritten? If you test a link more than once, your initial survey response will be overwritten by your new response. The cause is a cookie that throttles respondents to a specific number of responses in a given period, including you!
Here's three ways to avoid this issue:
1 Change the submissions default in the Link Builder → see Preventing multiple submissions 2 Use an incognito browser to test links → as in the example above 3 Clear your browser history before you retest a link


Filtering link results
To filter the results by link, return to your Dashboard and:
- 1
- Click “Add a new filter”
- 2
- Select “Delighted Link Name” → from the list of properties
- 3
- Filter your results → (ex. “Guadalajara,” “Paris,” and “Chicago,” )
- Note: "Pin" important results
-


QR codes — generating, downloading, and testing
QR codes make sharing a survey on posters, presentations, mailers, receipts, and other visual media super easy!
To download a QR code in either a "PNG” or “SVG" format:
- 1
- Click “Edit and send”
- 2
- Choose "Adjust settings" → from the Link platform tile
- 3
- From your list of links → click “Settings” adjacent the specific URL for your QR code
- 4
- From the “Download a QR code for your link”, choose an image type → "PNG” or “SVG”
-

- 5
- Open the image file → and apply your QR code as needed
- 6
- Scan the image to test your QR code
-
Can I adjust the size of my QR code image? Certainly! Set the Property name " Delighted_qr_png_size" to the desired number of pixels for the QR code image (ex. "500"). Note: QR codes will always be formatted in a square. Click the "X" to Remove the setting.


Link platform customization
Need to edit the customization settings of your Link project? Not a problem! There are two ways to access customization. The first option is to:
- 1
- Click “Customize appearance” → from the right side of the Link Builder page
-


The second option is to:
- 1
- Click “Edit and send”
- 2
- Choose the "Pencil" icon
-


About Link survey customization
Read Link Platform Customization from the Help Center for all of the details.
Editing link names
To change or edit the name of a link (ex. "Ireland" to "Dublin") in the Link Builder:
- 1
- Click “Edit and send”
- 2
- Choose “Adjust settings” → in the Link platform tile
- 3
- Click “Settings” → found next to the link you wish to rename
- 4
- In the Link Builder, → click the “Gear” icon next to the current name → (ex. "Ireland")
- 5
- Enter your new name into the “Edit link” window → (ex. "Dublin")
- 6
- Click “Save changes”
-


Deleting a link
Good news! Deleting a link does NOT delete any of the responses that you have already collected with the link, so you'll still be able to analyze the results after you take your survey offline.
To delete a link:
- 1
- Click “Edit and send”
- 2
- Choose “Adjust settings” → in the Link platform tile
- 3
- Select “Settings” → from “Your Links” list
- 4
- Click “Delete link” → at bottom of the Link Builder
- 5
- Click “OK” when asked, “Are you sure you want to delete this link?”
-

- 6
- You will have one last chance to “Undo” the deletion if you change your mind. (Look for the yellow notification bar)
-
About the "We can't find the page you’re looking for" error If respondents see the error message, “We can’t find the page you’re looking for,” chances are the survey has been deleted on the Link builder page

Remember to remove obsolete survey links from social media, email signatures, or wherever else they may live!


Using vanity URLs to identify links
The “Enable vanity URL” option will attach the link’s name to the end of the URL string. Flagging URLs in this way simplifies link management by making your links easier to spot!
Note: Just make sure the name of the link is something you're okay showing to respondents!

To enable vanity URL identification:
- 1
- Click “Edit and send”
- 2
- Choose “Adjust settings” → in the Link platform tile
- 3
- Click “Settings” → next to the link you wish to flag
- 4
- In the in-app Link Builder → click “Enable vanity URL”
- 5
- Click “Save changes”
-


Preventing multiple submissions
As you create a link with the Link Builder, you’ll see the “Prevent multiple submissions” box checked by default:
If “Prevent multiple submissions” is:
| Checked | The respondent can only respond to the survey once per month. If they submit another response, it will overwrite their prior answer |
| Unchecked | All responses will be received and recorded separately |

The cookie below enforce the “Prevent multiple submissions” setting. It only appears once a survey session has been submitted.
| Cookie Name | Cookie Value | Expires |
| stusrt | the survey ID | 1 month |
Pros and cons: Unchecking “Prevent multiple submissions”
Keeping “Prevent multiple submissions” checked will help you avoid being spammed as you go live.
Nevertheless, temporarily unchecking this feature is useful for testing, as you can test a link as often as you like without triggering a cookie or having to use an incognito browser.
Important: If your study requires you to survey people more than once per month, definitely remove the checkmark in the "Prevent multiple submissions" box.
Generating and using links for each scale point
The in-app Link Builder will "Get individual links for each score" or scale point in your question. One way to use individual score links is in email signatures. (For a detailed walkthrough, visit our Email Signature Surveys article.)

To generate individual links for each scale point:
- 1
-
Click “Edit and send” → and choose “Adjust settings” in the Link platform tile
- 2
- Click “Settings” → next to the link you wish to use for your individual links
- 3
- On the right side of the Link Builder → click "Get individual links for each score"
- 4
- Click the “Copy” button → next to each link
- 5
- Paste the individual score links, one by one, wherever you need them.
-


Adding properties with the in-app Link Builder
In this section:
- Introducing our adding properties video.
- Defining properties with names and values step by step.
- Filtering by extra properties.
- Removing and editing extra properties.
Introducing our adding properties video
In this part, we'll explore how you can add multiple layers of properties to each of your links with the Link Builder. Properties can add clarity, specificity, and context to your research.
-
See how you can add multiple properties Watch this video to see how it’s done! Key note:
- The "Edit and send" button has replaced the "Survey people" button
Need a refresher on properties before diving in deeper? Visit section 5. Managing People and Properties.
Defining property names and values step by step
Let’s add a new link for agent “Ellie” and layer in the following properties and values:
| Property name | Property value |
| Agent | Value (number) |
| Manager | Value (text) |
| Title | Value (text) |
To learn how to create a new link and append additional properties and values, review this example:
- 1
-
Click “Edit and send” → and choose “Adjust settings” from the Link platform tile
- 2
- Click “Add a new link” → under your list of active links
- 3
- Name the new link → (ex. “Ellie”)
- 4
- Click “Add a property”
- 5
- Enter “Agent” followed by a value → (ex. “003”)
- 6
-
Click “Add a property” → enter your associated properties → (ex. “Manager” followed by the value “Sean”)
- 7
- Click “Add a property” one more time → and enter new associated properties → (ex. “Title” followed by the value “Product Manager”)
- 8
- Click “Save changes”
-


Filtering by extra properties
To filter incoming results by any of the extra properties you’ve added, return to your Dashboard and:
- 1
- Click “Add a new filter”
- 2
- Select your new properties from the list. (Notice the purple "New" tags.)
- 3
- Filter your results → (ex. “Agent,” “Manager,” and “Title”)
- Note: Use the "Search" bar to find your property name quickly → (ex. “Manager”)
-


Note: Read all about the different ways to filter your Dashboard here.
Removing and editing extra properties
To edit property names or values, you must first remove and then recreate the property:
- 1
- Click “Settings” → next to the link in your list that you want to delete or edit
- 2
- In the Link Builder → click “Remove” to the right of the property and value
- 3
- Optional: To replace the deleted property → click “Add a property”
- 4
- Enter a new “Property name” and “Property value"
- 5
- Click “Save changes”
-


Appending properties to links — the traditional method
If you need more flexibility than the Link Builder allows, you can deploy the traditional method of appending properties to survey links as described in this section.
A common use case for this conventional approach may be to assist in sending email marketing surveys through third-party vendors, adding surveys to Salesforce campaigns, or dynamically sending surveys through certain integrations. (See section 8. Integrating with Other Applications in this Help Center.)
-
Do you have 5 minutes? We highly recommend watching this overview video we'll create links in a traditional and highly effective way. It’s well worth your time! Be advised:
- The "Edit and send" button has replaced the "Survey people" button
There are two key elements to keep in mind when passing customer data via the link:
| A | Proper encoding of the URL string |
| B | Correct structure for the name, email, and property parameters |
A. Proper encoding of the URL string
Keep these next encoding tips in mind when appending attributes to links:
| The first parameter should start with `?`, while all subsequent parameters should start with `&` (ex. https://delighted.com/t/Bo5cKjF1?name=Sean&email=hello%40delighted.com) |
| All special characters should be encoded (ex. %40 encodes the @ symbol). Consider using a URL encoder/decoder to help grab the correct encoding |
B. Correct structure for the name, email, and property parameters
| Name | "name=sean" |
| "email=sean%40delighted.com" (ex. %40 encodes the @ symbol) | |
| Properties | "propertyname=value" (ex. "Purchase Location" set to "Retail": "purchase_location=retail") |
Capitalization matters for both name and email parameters — which should be lowercase. For properties, you can decide on your own capitalization.
An applied example
With the above in mind, here is an example with the name set to Sean, email set to sean@delighted.com, and "purchase_location" set to "retail":
https://delighted.com/t/Bo5cKjF1?name=Sean&email=sean%40delighted.com&purchase_location=retail
A note about dynamic variables
Many third-party platforms include placeholders or "liquid variables" to pass over information such as recipient email and name parameters. Reach out to your platform's support team to confirm what’s available!
Why are respondents getting a “We can’t find the page you’re looking for” error
If the link your survey takers are clicking was deleted in the Link Builder, they'll receive an error message saying, “We can’t find the page you’re looking for.”
There are two options:
- Replace the deleted link with a new one
- Remove the reference to the deleted link
Why are newer responses overwriting older responses?
If you’re filling out the survey and older responses are being overwritten, you’re probably running into issues with cookies!
If "Prevent Multiple Submissions" is checked in the in-app Link Builder, any new responses submitted within 30 days will replace the previous answers — as if the survey had only been answered the one time.
Important: To collect all of the responses regardless of the frequency of their submission, uncheck "Prevent multiple submissions." (Read Prevent Multiple Submissions for all the details.)
Can I recover personal respondent information from an anonymous response?
No.
If a response is submitted anonymously, Delighted does not capture respondent information like names or email addresses. There is no way to identify who submitted the response.
Need to collect names and email addresses?
Add the “Name” and “Email” Additional question types to your survey so respondents can voluntarily enter their names and email addresses.
Note: You can also attach contact information to outgoing links to identify your respondents. It’s a bit technical, so we'll show you how it's done at the end of this article in Appending properties to links.
Why are new responses not being recorded?
Double check the version of the link that you've shared with your respondents. Is it the exact same as the link shown within the Link settings page, or does it contain more letters/numbers at the end? If so, you're using what we call the "expanded" link.
Instead, you need to use the base link that we give you in the UI.
For context, the "expanded" version of the link is the URL that alters as a result of being submitted on a webpage. You can see this by pasting the survey link into a new tab on your browser and watching it transform to the "expanded" version when you hit enter.
Important: If you distribute that expanded link, every response that is collected is overwritten by the next one and they will not appear in the Dashboard.
You will need to distribute the correct link if you want to load all of your responses in the Dashboard!