Web Platform Customization
In this article:
FAQs
- Can I remove the "Powered by Delighted" link?
- Can I have a dark background for the web survey?
- Can I move the Comment question to follow my Additional questions?
Suggested next article: Additional questions
Introducing Web customization
Want higher response rates? Customize your Web survey to match your brand. It's easier than you think and makes your messages more authentic and engaging.

In this article, we'll show you how to make high-value changes to the defaults, including to your:
-
- Initial survey question
- Open-ended follow up comment
- Additional questions
- Thank you page
-
Learn the basics of customization in this video from our Core training.
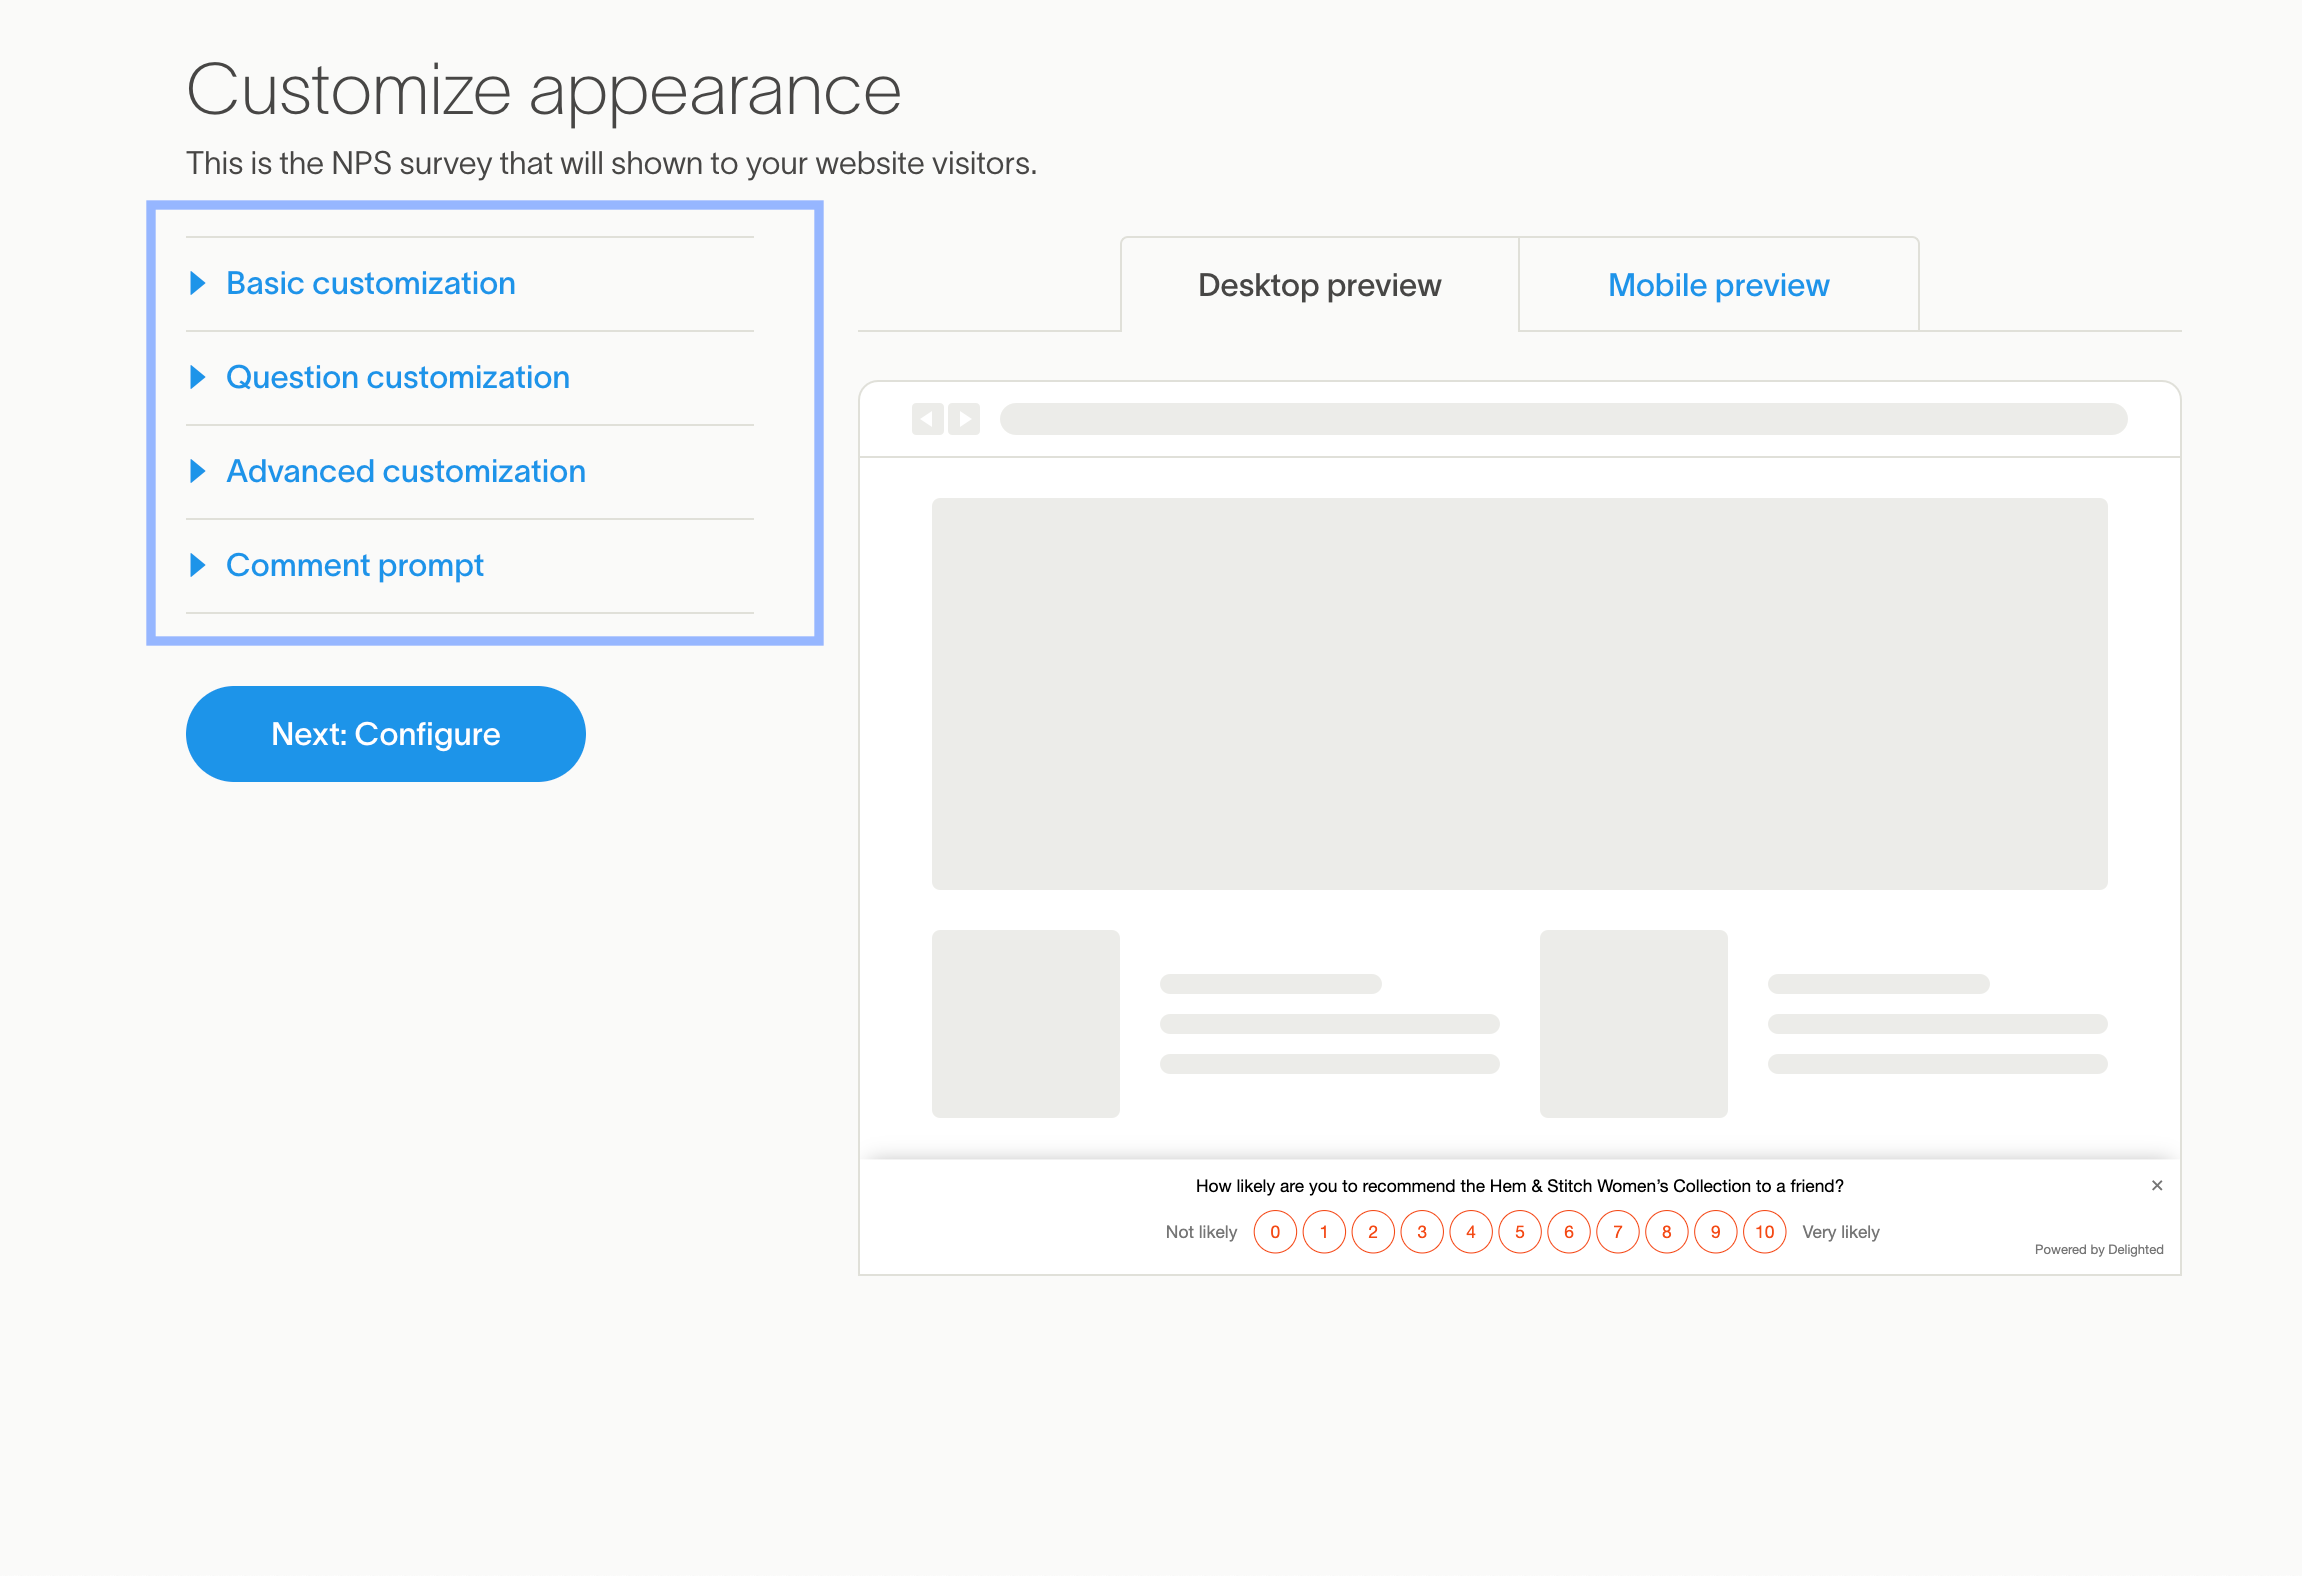
Finding your customization options
To locate your customization options:
- 1
- Click "Edit and send"
- 2
- Click the "Gear" icon → in your platform's tile
- 3
- Choose "Customize appearance"
-

-
Don’t see a Gear icon? You won’t see your "Gear" icon until after you've set up the Web platform. Choose “Set up” on the Web platform tile and follow the on-screen instructions to run through the initial setup routine. (See Setting up the Web platform.)


What do you want to change?
| Where to go... |
You can... |
|
| 1 | Basic customization | Modify the Brand or product name, the Top bar and Button text color schemes |
| 2 | Question customization | Revise the initial Metric question — (override the wording of the default question) |
| 3 | Advanced customization | Alter the Intro message above the initial question and change the default Language |
| 4 | Comment page customization | Edit the Comment question prompt — (adjust the open ended question that follows initial Metric question) |
| 5 | Thank you page customization | Change the Thank you page — (revise the screen that displays after the survey has been submitted). Note: You can use this page for post-survey redirects |
| 6 | Additional questions | Add, edit, and reorder up to 10 Additional questions. Note: Additional questions are added separately to each platform |

1. Basic customization
Basic customization lets you make the following changes to your CX project:

To make these changes:
- 1
- Click “Basic customization”
- 2
-
Required: Edit the
Brand/product name → (ex. we entered, "The Women’s Collection")
-
This required text entry automatically alters the default question. If you don't like the result, change it later in the Question customization section.

- 3
- Change the Brand color, Button style, and Button shape settings
-
Change your accent colors by clicking the down arrows and choosing a new color from the palettes. For more precision, enter your brand’s hex color codes (ex. #EF5F1C).

- 4
- Save your changes!


Brand/product name (required)
If you use the default question, your brand/product name will be inserted into your question automatically. For example, NPS surveys default to, "How likely are you to recommend [brand/product name] to a friend?"
- Adding "the Hem & Stitch Women’s Collection" changes the default NPS question to, "How likely are you to recommend the Hem & Stitch Women’s Collection to a friend?" See how to rewrite your entire question in Question customization.
-
Consider using Special Properties Interested in dynamically updating the brand/product name for each CX project? Check out our article on Special Properties to learn how.
Brand color
To change the color of your buttons, select your color from the color palette, or enter a specific hex code. Both options are found by clicking the down arrow in the color selection box. The brand color will be consistent through the entire survey experience — all the way to the Thank you page.
Button style
Change the style of your button. For example, outline the button with your brand’s color or add a white center. Change the style of your button. For example, outline the button with your brand’s color or add a white center.

Button shape
Select a shape for your button. And then change the shape of your buttons to align with the look and feel of your web page. Choose between rounded edges, sharp edges, or a circle.

Why don't I see a change after I select my Button options?
If you're using an icon-based question type, such as Smileys or 5-star, the button style won't affect your first question.

However, the Basic customizations will affect future Additional questions based on the question type selected.
2. Question customization
Reword your question text as needed. This will override the default question.

To edit your question:
- 1
- Click “Question customization”
- 2
-
Reword the default question → (ex. enter "
How likely are you to recommend The Women's Collection to your friends and family members?")
-

- 3
- Save your changes!

3. Advanced customization

Survey language
Delighted supports translation into dozens of languages. The language setting selected here will represent the default language of your survey.
Note: You can always translate the survey dynamically using our Locale special property. Check out this important article on translating your survey!
Intro message
The Intro message lets share how you will use the feedback, signal how long (or short!) the survey will be, and set the tone in your branded voice.
-
Can I dynamically update the Intro message on a per-person basis?
Yes! Check out our article on Special Properties to learn more.
To change your Advanced settings:
- 1
- Click “Advanced customization”
- 2
- Change your “Survey language” setting
-

- 3
- Save your changes!

4. Comment page customization

Your CX project automatically generates an open-ended question following the initial metric question. By default, it reads:
- "Tell us a bit more about why you chose X"
However, you have some compelling alternatives:
| A. Comment prompt options |
|
| B. Skip Comment prompt options | If the "Skip comment prompt" box is selected, your respondents will be taken to either your:
|
To edit your Comment page:
- 1
- Pick "Comment prompt”
- 2
- Option A: Enter a new “Comment prompt” → and click "Save changes"
- 3
-
Option B: Choose "Skip comment prompt" → and eliminate the page altogether. (Uncheck to restore the page)
-

- 4
- Save changes

-
Can I move the Comment question to follow my Additional questions?
It’s not possible to move the built-in Comment question prompt in the survey flow.
However, there is a workaround!
1. Skip the Comment question prompt as explained above
2. Create your Additional questions
3. Create a "free response" type Additional question and place it anywhere you like — first, last, or in the middle. (See Additional questions for more details.)
5. Thank you page customization
To reword your Thank you page, which is the message that appears after a recipient takes a survey:
- 1
- Click "Edit and send"
- 2
- Open the "Gear" icon → seen to the right of the platform tile
- 3
- Select "Customize thank you message"
-

- 4
- Pick either "Same message for everyone" → or "Different messages based on score" (ex. "Detractors")
- 5
- Enter your message
- 6
- Optional: Enter your "Link text"
- 7
- Optional: Enter your "Link URL"
- 8
- Save your changes!
-


-
Can I skip the Thank you page or use it to generate referrals?
Yes and yes!
Pop on over to our Thank You Pages article to learn how!
- Visit the Additional questions page to learn all the ins and outs.
6. Adding and editing Additional Questions
You can add up to 10 custom — yet optional — Additional questions to your Web survey. These questions will follow your initial survey question and comment prompt.
If you are new to Additional questions, be sure to catch the video in the introductory section. It's five minutes long and guaranteed to give you a massive head start.
Can I remove the "Powered by Delighted" link?
Not currently.
We include the "Powered By Delighted" link as a trustmark, allowing your respondents to learn more about our survey platform and the security and privacy policies associated with the Delighted brand.
Can I have a dark background for the web survey?
The core survey flow (the first metric question and the comment page) will always have a light background, as the survey sits at the bottom of the page and will not be disruptive on your site. If you'd like the Additional Questions modal, which pops up to cover your site page, to have a dark background, you can set the darkBackground parameter to true in the web snippet. Read more about this parameter on the web documentation page.